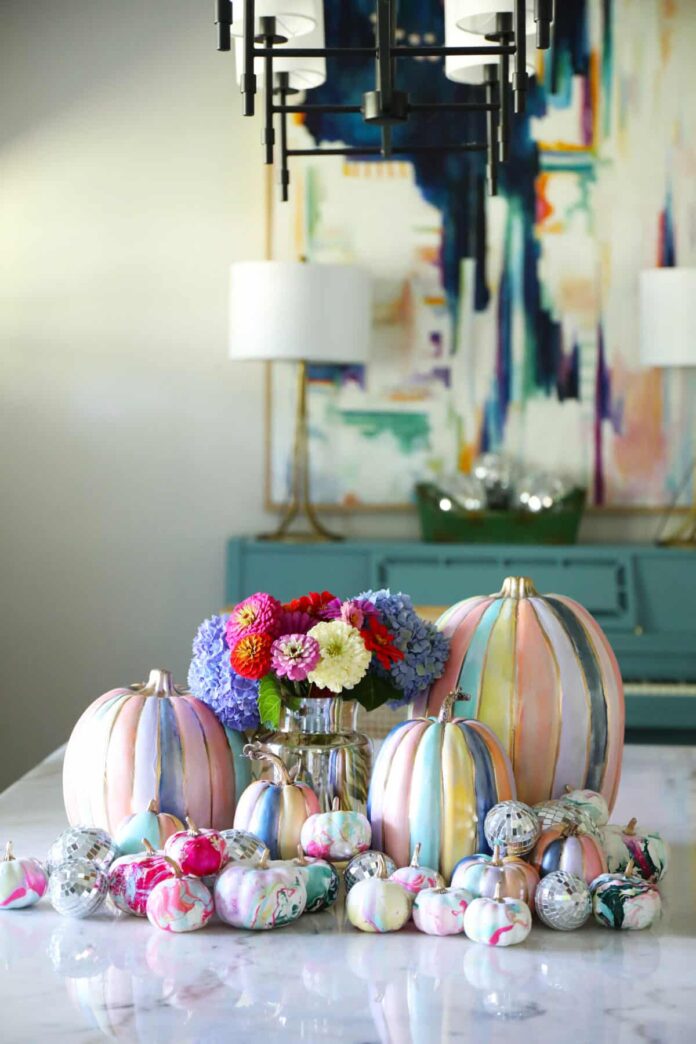
With the seasons changing, I’ve loved my little pumpkin projects in the past, but I needed some fun color in my life to sprinkle around our home. So last weekend, my daughter and I decided to sit down and paint a few. This is your reminder: Life is short… paint the pumpkins.

We adore how this little batch came out! There’s something kind of therapeutic about popping in a fun podcast and creating something pretty. All the colors are oh so fun, with a hint of sheen and shimmer to boot.

Total side note, but while I’m ready for the cooler weather, I definitely will miss my little front yard garden. It was great fun to incorporate some awesome colors into this shoot with my flowers! Definitely worth all the work every year.


Want to make some of your own? Here’s what you’ll need:
• Pumpkins: I feel like pumpkins have gotten pricier, so I did search the www for some good finds. Back in my day {cue grandma voice} I feel like you could just scoop them up in the craft bin for much cheaper prices, and they were large and in charge. Now they’re harder to come by. I knew I wanted a variety of sizes, so here’s where they were sourced: 7-piece set / 12-piece set / Then I sourced two from in-store, here. {9 inch + 13 inch}
We’re looking at two applications of paint here, so I’ll divide them up by category:
Marbelized:
• Fingernail polish of many colors – I used some from around the house and this little kit here.
• Small to Medium Tupperware container you can part with – something with depth so you can dip
• Water
• Optional: Rub-n-Buff or liquid leaf to paint the stems.
• Metallic Pastels:
• Liquid Leaf – to add the lines in the middle
• Premium metallic wax in silver
• Paint – anything in this genre will do – I ended up mixing a lot with white so they were more opaque
• Paint brushes of various sizes – any will do but I went with a medium, small and tiny size. See more below.
• Paper plate or palette of some kind.
Wax paper or dropcloths for drying both.

For the pastel metallic pumpkins, I started by breaking out all the paint colors I wanted to use on a paper plate and painting in between the grooves of each pumpkin. If they were too translucent, I would add white and/or take on a few coats after each one dried.

It honestly made it more interesting to loosely mix up the colors and add them as I went in varying tones to add a little subtle depth.

I just chose a loose pattern and varied my colors as I went around each pumpkin. Sometimes the lines were a little random in the mold, so I just made some of them up, if it made more sense visually to create a border for each color. {You can see an example of this in the left lavender color on the pumpkin below- two lines means I chose just one to make it make sense…}


When these were nice and dry, {read: the next day} I broke out the wax and a brush. I was going for a thin application with a slight shimmer. So I found it helpful when I applied it in two ways.

First, I dry-brushed each little section. Before it could dry, I went back with a damp paper towel and smoothed some of it out randomly.

For the secondary application, I took a damp paper towel, rubbed it in the wax, and then applied it sparingly to the pumpkin. I adjusted as I went, with the desired thickness of the paint. Overall, for the simple sheen look I was going for, I left it in increments on the pumpkin for added interest.

I also used a little of it on the stems, along with the liquid leaf to make it golden on top.

For the liquid leaf section, I took a thin paintbrush and, positioning it at the top of the pumpkin, let it drizzle down into the indentations. Sometimes this was easier than others, as some sections needed a little help/manipulation. Tada! Let them dry on a safe work surface and you are finito!

Next up: These simple marbelized pumpkins. This has been around forever, and we wanted to try our hand at our own.


Fill a tupperware container of choice {you probably won’t want to revive it after this, so pick one that doesn’t matter} and fill it with water about 3/4 full. Use drops of fingernail polish to create whatever pattern you want… a little goes a long way.

Experiment with this process, but then, when the water is ready, lightly drag while rotating, or dip your pumpkin in the surface. Each technique has a different outcome. The fingernail polish attaches to the pumpkin, and you’re finito! You can even do a second dip or three if you want to do it in sides. Move it to a safe drying space.

I ended up using a little liquid leaf here to finish off the stems once dry, and it really took them to the next level.


TADA! So very fun and colorful for us summer gals not ready to move into fall… But we will settle if a little color is invovled.


Don’t we just love the way these turned out!? A little therapy and insta decor all in one.

So what are your favorite elements in these pumpkins?
We’d love to hear. Have an inspired day, and let us know if we can answer any questions!


