


I’ve been yapping about my newfound adventures as a personal house purger for weeks now, and I can’t decide if it’s my new identity or if I’m just totally traumatized by it, since I just took on our entire home. Probably both. However, one of the most rewarding aspects of this process was clearing out my downstairs studio/office. No cabinet or bookshelf was left unturned. Or behind, for that matter. That left my office feeling roomier than usual, and I needed something for that wall. Today I’m sharing how I repurposed this one thing: How To Make a Giant Dry Erase Board.

We’ll rewind for a second, though, because once upon a time, the corner of our basement looked like this, so it’s come a long way. A really long way. When I start to feel guilty about my hoarder office, I just remember that we’ve at least made it pretty.

And without boring you to tears, it held up well once it was repurposed. But I was “doing too much” as the kids like to say these days. Too many pieces. Too much storage. This was getting out of hand.

This photo is honestly mid-purge from the last time I purged it… which was taken circa October 11, 2020. Shame. SHAME.
So, this time, I knew it was time to clear some things out. Ever since we reorganized the basement with the new closet after our primary suite was built {this meant that the fridge + washer and dryer could now go upstairs} we had a gap on this wall, where the fridge once stood. It felt good to get a little function out of this wall, with the filing cabinet, and table, which we use for projects and client work. I even added some paintings for color, and adore the final look.

This is the view from the other side, which holds even more samples, the printer, and just about everything else.

I still have this built in, which works really hard in the meantime… and that blue piece that I adore, too.

This one holds the house our oldest made from his architecture courses in high school. I mean, how could I part with it? The perfect accessory, considering what we do, too.

This desk is still the perfect fit, too. I just changed the way it holds things, using trays instead of these overbuilt {heavy} baskets for easy accessibility. And, of course, we love our Kichler lights. When we remodeled this space, we knew that we needed storage for client samples that could work hard for us. So we also had these towers built on each side, to fit perfectly with the desk. No regrets because they hold so much, it’s hard to part with said samples even when we know they’ve been discontinued. See: The reason I have this problem.

Oh, and I would have photoshopped out those cords, but I was just to glad to have my office back online I haven’t hidden them away yet. Just keeping it real. ;}
But here we are, back at the giant dry erase board! This one is so easy, it’s kind of embarrassing.

But it’s such an easy project, it’s actually left over from a former project. Once I moved these extra pieces of furniture, I had the wall. And I didn’t want to hide that glorious wallpaper, because I’m still in love. So I had the idea to have a giant dry erase board, that could actually work hard, whilst still showcasing the wall.

This photo doesn’t do it justice, but the writing is actually easy to see against such a light backdrop.
Here’s what you’ll need:
• Plexiglass or Acrylic: they’re essentially the same thing and vary in thickness. We had this 4 x 4 piece cut at the local glass shop in Nashville.
• Brass standoff screws: sourced here – you can make so many things with these, from picture frames to acrylic boards and more.
We started by measuring 1.5 inches inward from both edges, on each corner, and marking there. Then we measured to the center, and in 1.5 inches on each side, and marked there.

We started out with a smaller drill, and worked our way to the larger one, to match up the hole size that we needed, and to help with the whole acrylic-not-cracking thing.

Something we’ve found helpful was that when the drill was is on reverse, it works better. Weird right?
Somehow it’s less likely to crack that way. Also, leave the protective coating on both sides, while you do this step, to help protect against scratches.


Tada! Our plexiglass holes were ready. From there, we lined up each brass piece {the thicker part} underneath each acrylic hole so that we knew where to drill into the MDF.

From there, we lifted it to the wall, and marked the center screw hole at the height I wanted. I wore gloves as I had just cleaned this plexiglass off, and didn’t want to add unwanted handprints. We anchored that first center one into a stud, and added the first screw for it to sit. Then, with a level, we marked each hole, so that it would definitely hang straight. We didn’t have a lot of wiggle room for mistakes, so we’re glad this one was right.
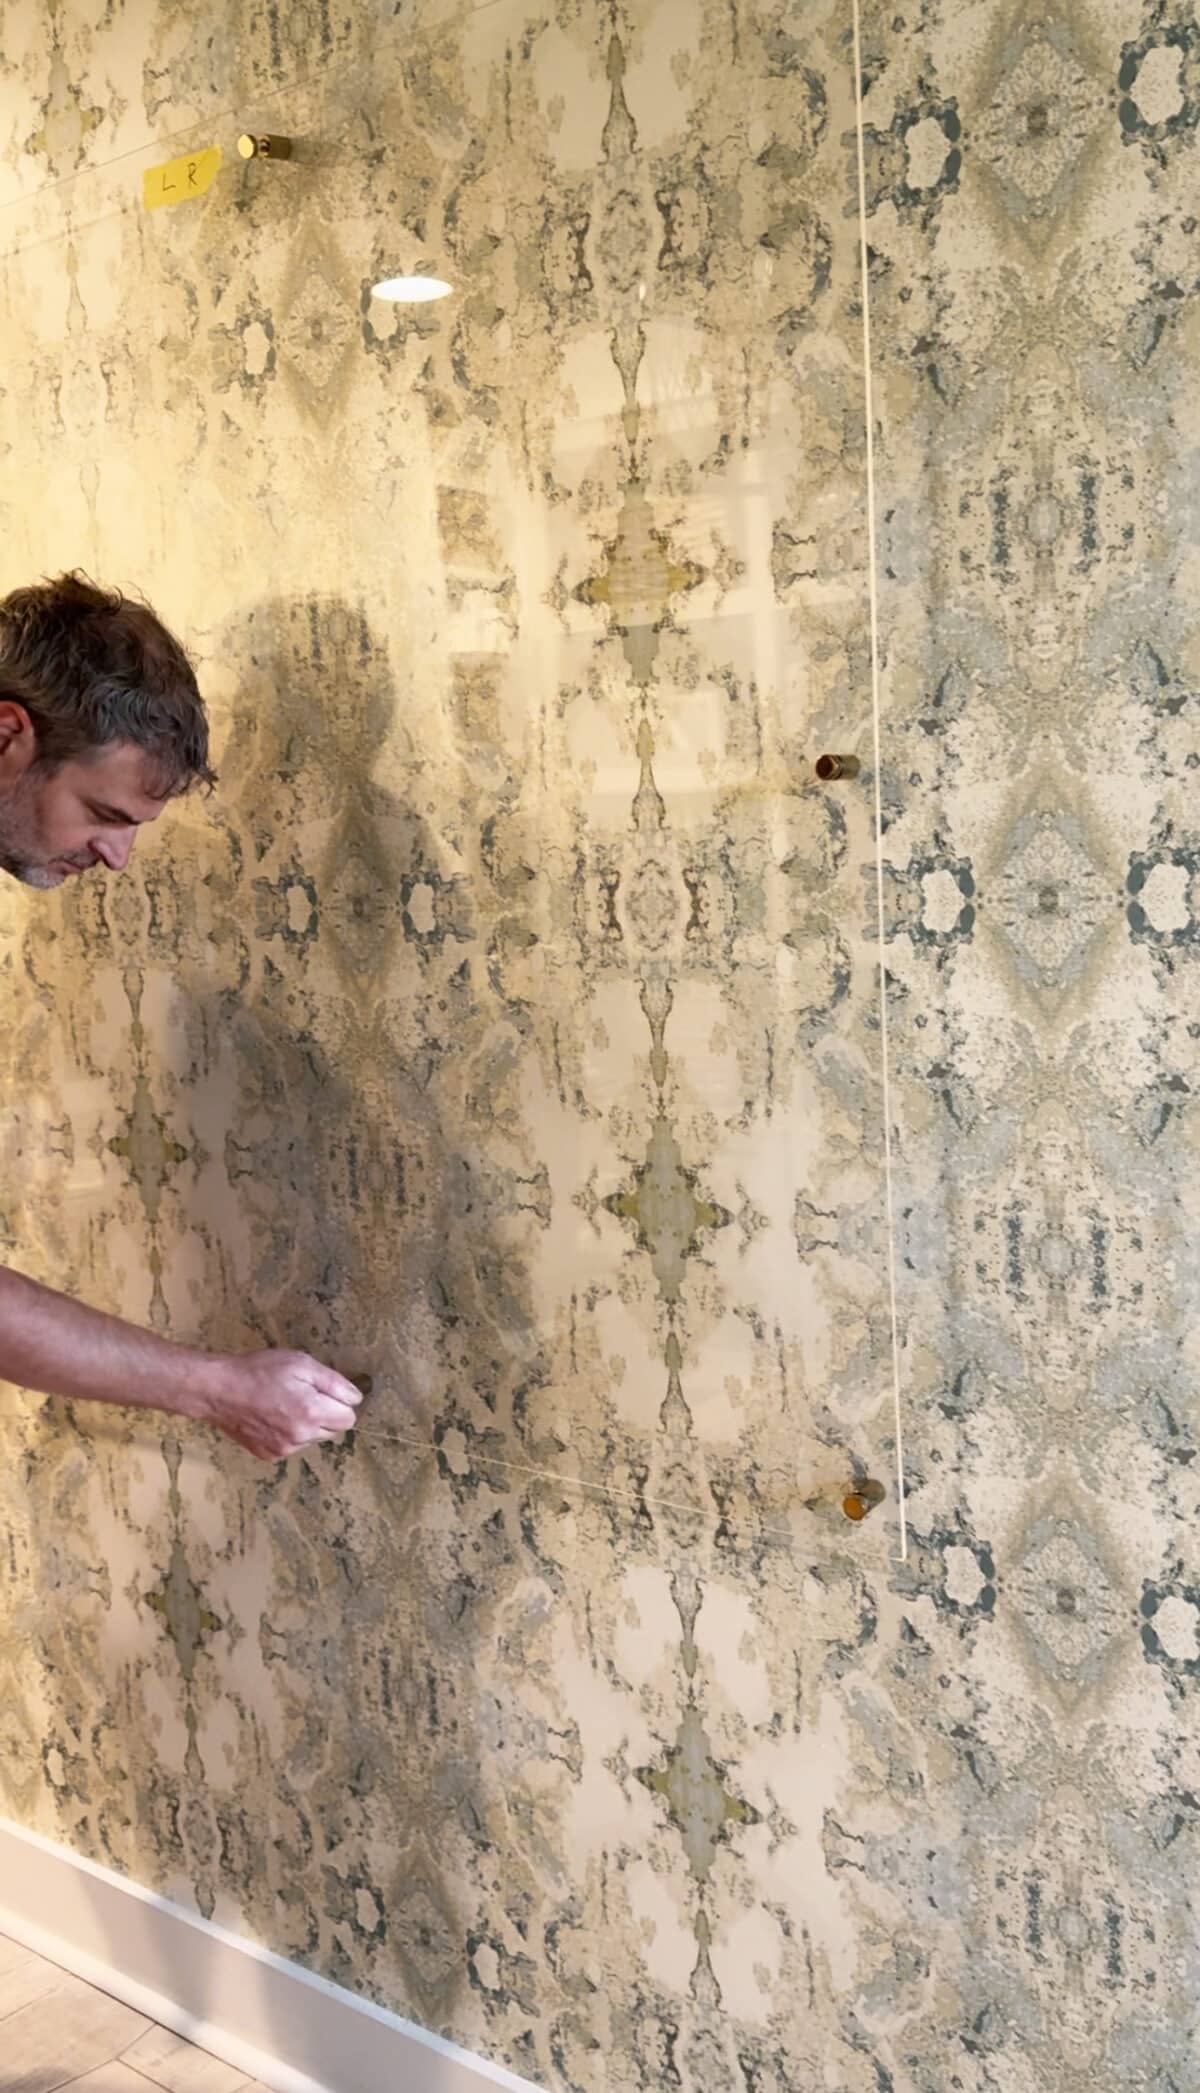
Then we removed the glass again and added anchors into each hole, along with the initial screw. Then we added the anchors into each space in the wall. Holding the acrylic up again, we then secured the top part of each screw. Do each one loosely around each side, slowly tightening each one on opposite sides until it’s secured.
Helpful tip: If it’s not going in perfectly, slowly add each one to help level it out. This step requires patience, as you need to be careful not to over-tighten. But once it’s up… it’s up!

And we were finito! Again, the video {today on insta} and photos don’t do it much justice, but it’s a really fun piece to have in my office. It also holds samples, and one of my favorite ever photos of the kiddos.


I love this easy addition!
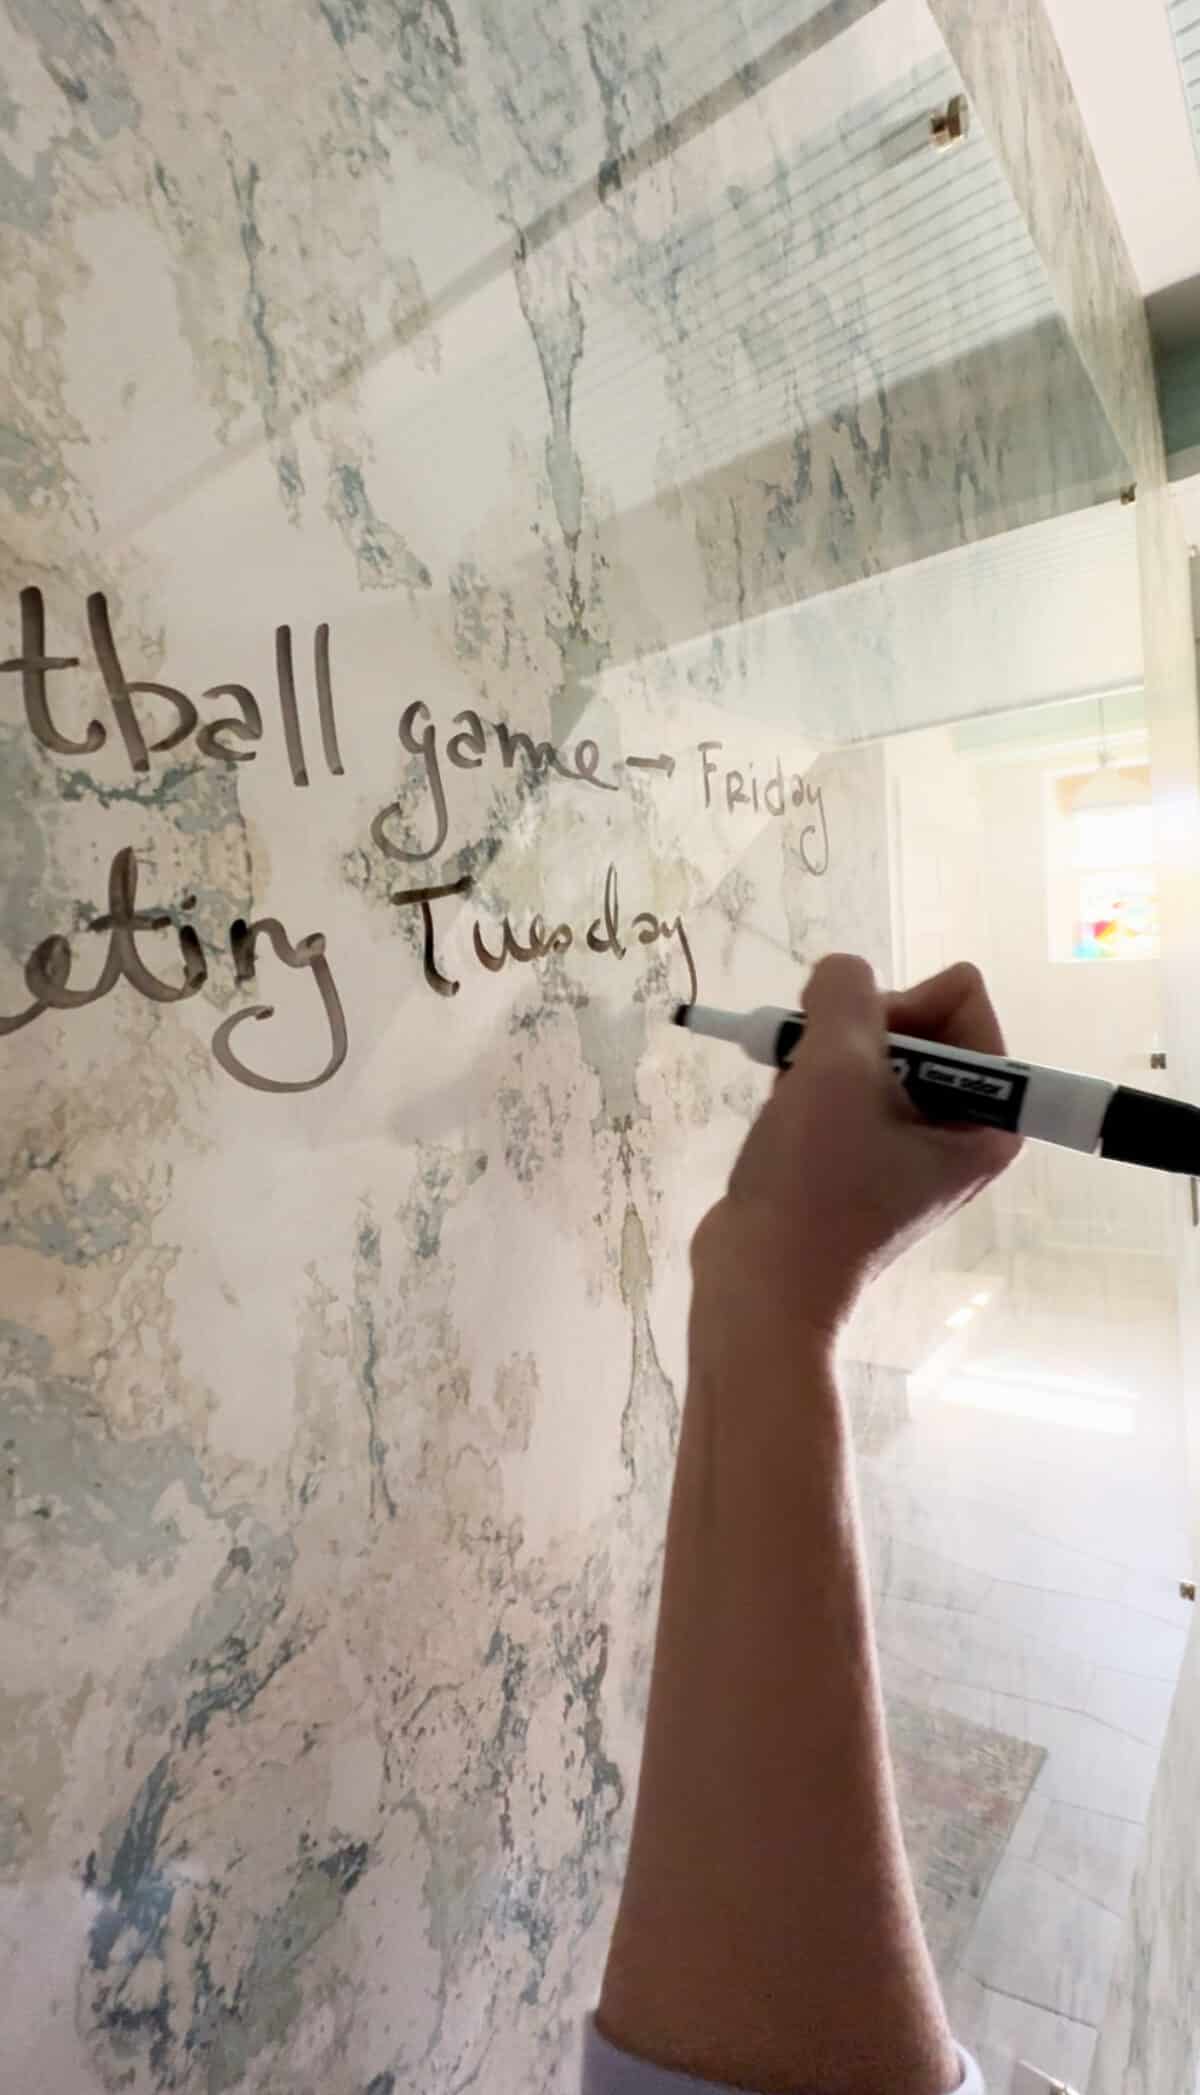
And that concludes the simplest project ever with a big payoff in the end. Maybe a little silly to write about, but oh so satisfying to have that big list at the end of the day. My friends have never seen my office so clean, and I love having this little message board / dry-erase board / memo board / whatever you want to call it on my wall.
![]()
![]()

Just a quick photo of me beside it so you can see how large it is!


And that concludes our little basement office tour. I adore having such a functional space after all these years to stay organized with our many projects. As always, let us know if you try it… we’d love to hear! OR if you have any questions. I’m happy to answer or shoot you in the right direction. Have an inspired day!


